• You can now help support WorldwideDX when you shop on Amazon at no additional cost to you! Simply follow this Shop on Amazon link first and a portion of any purchase is sent to WorldwideDX to help with site costs.
  • Click here to find out how to win free radios from Retevis!

Anytone Ares 2 with RFX95HD Install

Shadetree Mechanic

Delaware Base Station 808
Oct 23, 2017
7,189
12,602
798
52
The First State (Delaware)
At the risk of making a big radio even bigger, I put an RFX95 on my Ares 2. The installation is not too hard, and the directions that come with it are pretty good and fairly easy to follow.

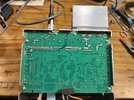
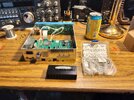
When you take the heat sink off, you will find that the transistor mounting screws thread into it. I ended up buying a small nut assortment from Amazon. Don't tighten them too tight, or you will crack the ceramic insulators. Firmly snug will do it.
IMG_20230720_165645247_HDR.jpg


MCMASKE 300PCS Metric M1 M1.2 M1.4 M1.6 M2 M2.5 M3 M3.5 304 Stainless Steel Hex Nuts Assortment Kit for Screws and Bolts

Amazon product ASIN B0B7SLDHK1
 
Last edited:

That's the first time I have seen this done. How is it working out for you? Given the ARES 2 barefoot output is very clean, it would be great to see what the output looks like on a scope and SA.

73
 
That's the first time I have seen this done. How is it working out for you? Given the ARES 2 barefoot output is very clean, it would be great to see what the output looks like on a scope and SA.

73
Initial testing looks very good, sounds very good on my station monitor. I don't have a SA, but I will be sure to get some scope pictures.
 
  • Like
Reactions: Eldorado828
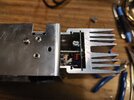
I put a toggle switch in the back on the blue trigger wire, because when driving with other vehicles, the amp is not needed. I moved the factory label down and trimmed the bottom of it off with a knife. There was already a small hole there, I made it bigger and installed the switch.

The mounting holes for the heat sink were slightly wider than the RFX. I just centered it up, and tightened it down. The 1/2 inch hole for the wires, I drilled with the radio laying down, board up, so the shavings did not fall on to the board. Then I cleaned the hole up so there were no sharp edges.

IMG_20230720_212546440_HDR.jpg
 
Last edited:
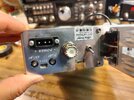
With the RFX wired to the factory power socket, I feel that the socket is not big enough. The factory wire doesn't seem big enough either, so they gotta go.

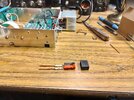
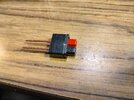
I pulled the factory socket out and yanked the pins. I drilled out the center and trimmed the rest with a pocket knife. The power pole plug body was thinned slightly with a belt sander, and solid 12awg wire was soldered to the pins.

IMG_20230729_172825664_HDR.jpg


I drilled a small hole and staked it with a short piece of 12awg.

IMG_20230729_180754850_HDR.jpg

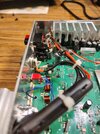
I bent the 12awg into a circle, and had to remove the top factory ferrite. I found a small ferrite bead in my parts bin, and put it on the RFX wires. Not really needed, just good practice.

IMG_20230729_194312142_HDR.jpg
 
Last edited:
Initial audio tests are very good, but I still don't like the way the RFX sounds on side band. I adjusted the bias, and all is good now. This adjustment must be done with an amp meter in line to get the transistor up to the point right before it turns on. Do not turn it all the way or you will burn the transistor up. (Ask me how I know) I will add more details on this later. I mounted the RFX with the bias pot to the outside to make it easier to get to.

IMG_20230729_194444855_HDR.jpg
 
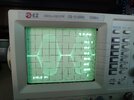
Still working on scope pictures, not looking good so far. The carrier pinches hard with the RFX turned on. The power knob adjustment will adjust the carrier and peak at the same time, and the carrier is always 1/4 of the peak. What I need is the old fashioned swing kit so I can adjust the carrier independently of the peak.

Maybe @BlueBeam can help?
 
Last edited:
  • Like
Reactions: Eldorado828
Still working on scope pictures, not looking good so far. The carrier pinches hard with the RFX turned on. The power knob adjustment will adjust the carrier and peak at the same time, and the carrier is always 1/4 of the peak. What I need is the old fashioned swing kit so I can adjust the carrier independently of the peak.

Maybe @BlueBeam can help?
I was afraid of that. That chassis is excellent but most every variant of that board doesn't like to swing from a low carrier.
Hopefully you can iron it out my friend.
 
  • Like
Reactions: Shadetree Mechanic
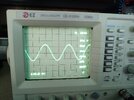
On AM, it needs some help. I can turn the mic gain all the way down and it will look ok, but it's hard to keep it that way. It sounds like the carrier is pinching, not the worst I have ever heard. I have read that in this condition, it can sound perfectly fine at a distance.

I am thinking that raising the carrier a little bit will clear this up, but the power knob adjusts the peak and the carrier together at a 4:1 ratio. Is there anything else that would help?


IMG_20230802_161937640.jpg
 
  • Wow
Reactions: Eldorado828

dxChat
Help Users
  • No one is chatting at the moment.
  • @ Mark Malcomb:
    Hello BJ. Been a long time since I've been on. You doing well? Mark Malcomb
  • @ Naysayer:
    I’m
  • @ kingmudduck:
    Hello to all I have a cobra 138xlr, Looking for the number display for it. try a 4233 and it did not work